Are you thinking how to turn a raspberry pi into a ps3 controller or how to turn a raspberry pi into a gameboy or are you thinking whether is it possible to convert your raspberry pi in to a gaming system ? Then you are in the right page, we will be going through the step by step process on how to build a Raspberry Pi retro game console.
What is RetroPie?
RetroPie allows you to turn your Raspberry Pi into a retro-gaming machine. It builds upon Raspbian, EmulationStation, RetroArch and many other projects to enable you to play your favorite Arcade, home-console, and classic PC games with the minimum set-up. For power users it also provides a large variety of configuration tools to customize the system as you want. Retropie lets you entire childhood is within reach!.
RetroPie
What is an Emulator?
An emulator is software that makes a computer behave like another computer, or in the case of RetroPie a computer that behaves like a video game console such as the Super Nintendo. The RetroPie SD image comes pre-installed with many different emulators. Additional emulators may be installed from within RetroPie.
What do you need to build a raspberry pi gaming console.
- Raspberry Pi 3 Model B+ (for best performance its recommended to use this model)
MicroSD Card
MicroSD Card Reader (for connecting SD card to computer)
HDMI cable
Television / Monitor
5V 2A Micro USB Power Supply
USB Keyboard and Mouse
- WiFi or Ethernet Cable
- USB Game Controller(optional , you can use keyboard also to pay the games)
- USB memory stick( for copying roms)
Installation | How to Build a Raspberry Pi Retro Game Console:
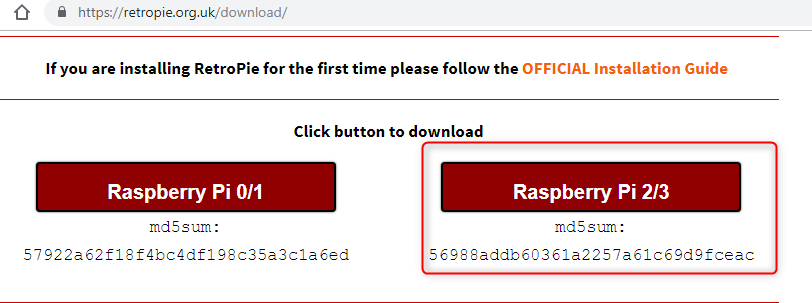
Go to https://retropie.org.uk/download/ and click on Raspberry Pi 2/3 ( if you are using other modes of raspberry pi like 0 or 1 you need to download the image Raspberry Pi 0/1) to download the Retro pie SD image.
The image file is around 700 MB , once you downloaded the image, extract the fie "retropie-4.4-rpi2_rpi3.img.gz" using a program like winzip or 7zip. You will extract the downloaded .gz file and the extracted file will be a .img file.

Before we copy the Retropie image to the SD card , it has to be formatted. Use the software SD Memory Card formatter to do the same.
Download the Card Formatter from https://www.sdcard.org/downloads/formatter_4/index.html & install it on your PC. When you go to the download page , you can select download respective to your PC operating system, & then click on Agree in license agreement.
Go the downloaded folder & run the SDcardformatterXXXsetup.exe . Once the installation is completed you will be able to select the drive from the drop down to the SD Card drive letter. Make sure you are selecting the right drive letter when formatting. Use SD Card reader to insert Micro SD card & connect to the PC. Once you selected the drive letter correctly, click on format. We are ready now to copy Retropie Image in to the SD card.
To install the RetroPie SD image on your MicroSD card you can use a Etcher or Win32DiskImager. We are using Win32DiskImager now.
- Connect an SD card reader with the SD card inside.
- Open Win32DiskImager and Select the image file "retropie-4.4-rpi2_rpi3.img"
- Select Device letter to the respective SD card drive letter. ( D:\ for me, yours will be different)
- Click on write, Wait and click on Finish once completed.

we are almost done on how to build a raspberry pi retro gaming emulation console, The SD card is ready now with Retropie image. Insert the Micro SD card in to Raspberry pi. Connect the Pi to TV/Monitor using HDMI cable, Connect the USB Keyboard, mouse. Power on the pi connecting the Power supply.
On first boot your filesystem will be expanded automatically, you will then be welcomed with the following screen- this menu will configure your controls for both Emulationstation and RetroArch Emulators:
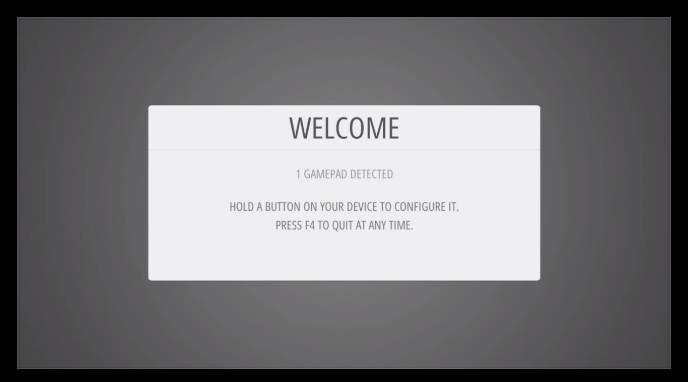
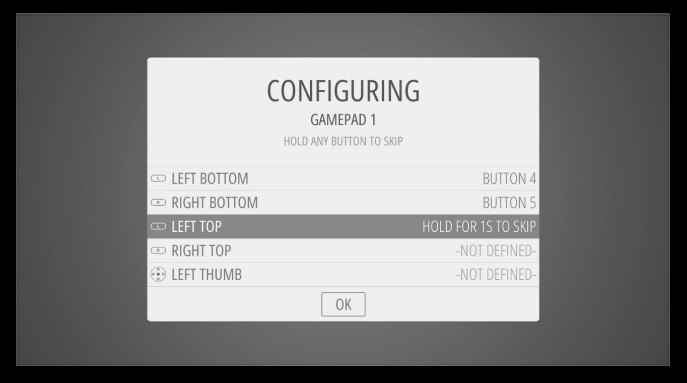
Hold down any button on your keyboard or Gamepad and the name will appear at the bottom and then open up into a configuration menu.Follow the onscreen instructions to configure your gamepad or Keyboard.
When you first see emulation station, you may not see all systems like gameboy, snes, paystation etc.don't worry a Roms are not installed by default , you need to copy the respective Roms to the SD Card using a USB memory stick.
On RetroPie 4.0+, not everything is installed by default. The pre-made images contain the best working emulators for each system supported by the hardware.
Transferring Roms through USB
- Format the USB memory stick to FAT32 or NTFS
- first create a folder called
retropieon your USB stick - plug it into the pi and wait for it to finish blinking
- pull the USB out and plug it into a computer
- add the roms to their respective folders (in the
retropie/romsfolder) - plug it back into the raspberry pi
- wait for it to finish blinking
- refresh emulationstation by choosing restart emulationstation from the start menu
After you've added your roms you need to restart emulationstation in order for them to show up. You can restart emulationstation from the start menu, or by rebooting your pi .
Still thinking about How to make a Raspberry Pi Retro Game Console!, Don't be , go head and start the installation. its pretty simple. The kids will love to play the games in Retropie.
Retro gaming reference : https://retropie.org.uk/docs/First-Installation/
Find out the other Amazing uses for raspberry pi | Top 5 uses of raspberry pi.