In our previous IoT projects , we have started with simple Lighting LED with Raspberry Pi & Python script project for controlling led with raspberry pi and raspberry pi gpio programming. We also did the LED blink with Cayenne application, now its time for simple button input with the raspberry pi and more raspberry pi gpio projects.
Lets see what is required and connections for a raspberry pi led and button project. If you are looking for turn on led with push button arduino or using a push button switch with arduino this is not the right article. We are only going to use Raspberry Pi here.
What do you need:
- Raspberry Pi
- Micro USB Power Adapter
- Bread Board
- LED
- Push Button
- Resistor -330 ohm and 10K ohm
- Jumper wires - Male to Female and Male to Male
Using a breadboard is the best way to do prototyping the electronic circuits rather soldering the components together on a PCB.We use breadboard to test circuit design & it is easy to make the changes , as we just need to re-plug the wires.
The details for GPIO pins I have described in my previous post, refer the post my IoT devices .
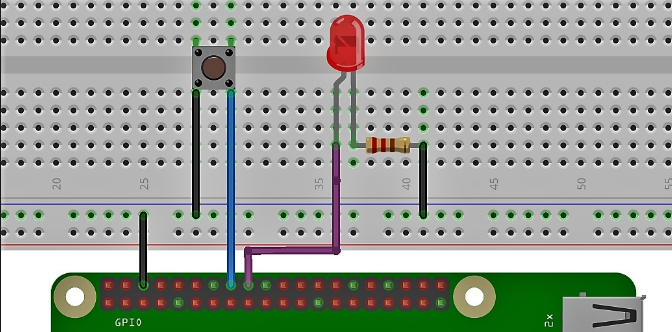
Lets see how we need to do the connection or circuit for this raspberry pi push button led control.
I have used the GPIO pin 2 for 5 v , GPIO pin 6 for GND, GPIO pin 17 as Output and GPIO pin 18 as Input for the circuit. Connect the GPIO PIN 17 to the anode of LED & the GPIO PIN 18 to the Push Button. Connect the resistors , GND and 5V as shown in the below diagram. Once we have the circuit setup & the raspberry pi is powered on, it is now time to write the python code.

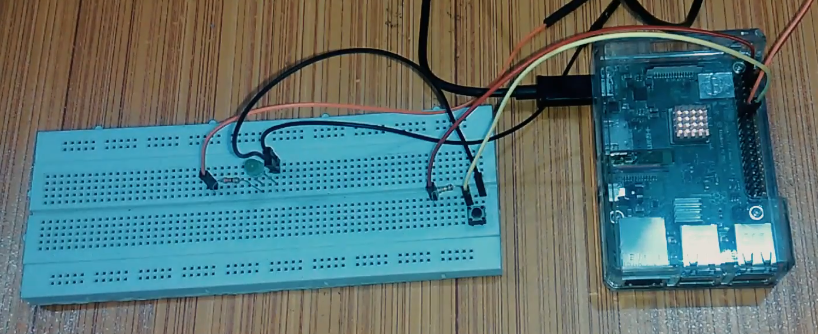
The real diagram of using a push button with Raspberry Pi GPIO.
Lets write the raspberry pi button led python script. Open a file using Nano and write the below program.
import RPi.GPIO as GPIO
import time
GPIO.setmode(GPIO.BOARD)
GPIO.setup(17, GPIO.OUT)
#LED is connected to Pin 17
GPIO.setup(18, GPIO.INPUT)
#PushButton is connected to Pin 18
try:
while True:
if GPIO.input (18) == 0:
print ("led is On")
GPIO.output (17, True)
if GPIO.input (18) == 1:
print ("led is OFF")
GPIO.output (17, False)
finally:
GPIO.cleanup ()
The above script will give print output continuously , lets modify this Push button to turn a led on and stay on until pressed again script for better one.
import RPi.GPIO as GPIO
import time
GPIO.setmode(GPIO.BOARD)
GPIO.setup(17, GPIO.OUT)
#LED is connected to Pin 17
GPIO.setup(18, GPIO.INPUT)
#PushButton is connected to Pin 18
ledstate = 0
try:
while True:
if GPIO.input (18) == 0 and ledstate == 0:
print ("led is On")
GPIO.output (17, True)
ledstate = 1
time.sleep (0.5)
if GPIO.input (18) == 1 and ledstate == 1:
print ("led is OFF")
GPIO.output (17, False)
ledstate =0
time.sleep(0.5)
finally:
GPIO.cleanup ()
I found out that there are multiple ways for writing python script for led projects with raspberry pi and this depends also on the connection how we are setting up. We can have a different way of connection for push button raspberry pi 3 and LED. Lets see the below circuit diagram for connect push button to raspberry pi in a different way.
Lets see the below Python program to push button control led with direct connection.
import RPi.GPIO as GPIO
import time
GPIO.setmode(GPIO.BOARD)
GPIO.setup(17, GPIO.OUT)
#LED is connected to Pin 17
GPIO.setup(18, GPIO.INPUT)
#PushButton is connected to Pin 18
try:
while True:
button_state = GPIO.input(18)
if button_state == False:
GPIO.output(17, True)
print('Button is Pressed and LED is ON')
time.sleep(0.5)
else:
GPIO.output(17, False)
except:
GPIO.cleanup()
I hope this push button raspberry python program is useful and we will be able to do more and more raspberry pi projects.