In This tutorial we will see how to build home security system with email notification. In my previous posts we have seen other IoT Projects with raspberry Pi and how to use Cayenne to create triggers. Here we will be using Python script to generate email when detecting any trespassers movement. We can call this a IoT project as simple Raspberry Pi based Intruder Alert System (home security system with email using raspberry pi, sending email using raspberry pi and pir sensor).
The components needed:
1. Raspberry Pi
2. PIR Motion Sensor
3. Connecting wires
4. Power supply for Pi
We will be building this home security system using PIR Motion sensor. PIR sensor will detect the motion (presence of intruder) and will alert you immediately by sending an email.You can install the sensor in front of your door , or any other place and you will be notified about the intruder even if you are any where in the world.
Connection:
First you need to Set up the Raspberry Pi 3 for the project. For setting up the raspberry pi with operating system follow my tutorial. Download the image and install it on the SD card, Connect to WIFI or ethernet cable.

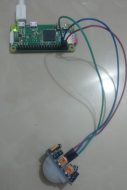
PIR sensor has 3 pins, labelled VCC, OUT and GND. We will be using Raspberry PI pins 4 (5V) , 6 (GND) and 7 (GPIO4).Lets connect the PIR sensor to the Raspberry Pi, use Female to Female Jumper wires or you can use Breadboard in between the connections.Connect the PIN labelled as VCC on the PIR sensor to the 5V pin on the Raspberry Pi, connect the middle one labelled OUT to Pin GPIO4, and connect the Pin labelled as GND to a ground pin 6.
PIR Sensor + Email. Now its time to write the python code, to detect the motion and send email.
Open Python Idle and copy the below code in to it. Change the "from_email" , "from_email_password" and "to_email" to your respective emails and password. We are using gmail here so you should use Gmail email address, otherwise it wont work. If you are using any other email address change the SMTP and port for the respective email configuration. I have written the same program in 2 different ways, both gives the same output. See the below.
IoT based home security system using raspberry pi
Program 1:
import RPi.GPIO as GPIO
import time
PIRSensor = 4
GPIO.setmode(GPIO.BCM)
GPIO.setup(PIRSensor, GPIO.IN, GPIO.PUD_DOWN)
previous_state = False
current_state = False
while True:
time.sleep(1)
previous_state = current_state
current_state = GPIO.input(PIRSensor)
if current_state != previous_state:
new_state = "HIGH" if current_state else "LOW"
print("GPIO pin %s is %s" % (PIRSensor, new_state))
import smtplib
server = smtplib.SMTP('smtp.gmail.com', 587)
server.starttls()
server.login("from_email", "from_email_password")
msg = "Security Alert! INTRUDER!"
server.sendmail("from_email_address", "to_email_address", msg)
server.quit()
Program 2:
import RPi.GPIO as GPIO
import time
import smtplib
PIRSensor = 4
GPIO.setmode(GPIO.BCM)
GPIO.setup(PIRSensor, GPIO.IN, GPIO.PUD_DOWN)
Current_State = 0
Previous_State = 0
try:
print "Waiting for PIR to settle ..."
# Loop until PIR output is 0
while GPIO.input(PIRSensor)==1:
Current_State = 0
print " Ready"
# Loop until users quits with CTRL-C
while True :
# Read PIR state
Current_State = GPIO.input(PIRSensor)
if Current_State==1 and Previous_State==0:
# PIR is triggered
print " Intruder Alert!, Motion detected!"
#Send mail
server = smtplib.SMTP('smtp.gmail.com', 587)
server.starttls()
server.login("from_email_address", "from_email_password")
msg = "Security Alert! INTRUDER!"
server.sendmail("from_email_address", "to_email_address", msg)
server.quit()
# Record previous state
Previous_State=1
elif Current_State==0 and Previous_State==1:
# PIR has returned to ready state
print " Ready"
Previous_State=0
# Wait for 10 milliseconds
time.sleep(0.05)
except KeyboardInterrupt:
print " Quit"
# Reset GPIO settings
GPIO.cleanup()
One of the common question will arise is normally we use GPIO.IN or GPIO.OUT in GPIO.Setup and Why to use GPIO.PUD_DOWN in GPIO.setup(sensor, GPIO.IN, GPIO.PUD_DOWN) not just GPIO.setup(sensor, GPIO.IN)?
An input gpio will float between 0 and 1 if it's not connected to a voltage.The pull-up/downs supply that voltage so that the gpio will have a defined value UNTIL overridden by a stronger force. You should set a pull-down (to 0) when you expect the stronger force to pull it up to 1 or you should set a pull-up (to 1) when you expect the stronger force to pull it down to 0. Otherwise the gpio will not change state and you'll never know about the external event.
In upcoming projects we can extend this home security system to integrate along with Raspberry Pi Camera to detect the intruder and capture the Image along with the email. We could also build live feed from the Camera to make it more impressive security system.